UV & Textures
A texture is a flat image wrapped around a 3D model. The UV editor shows you that wrapping — the model's surface unfolded into a square — and lets you rearrange it, generate it from scratch, paint straight onto it, and give different parts of one mesh their own materials.
Everything here is shared: a peer sees your unwrap, your brush strokes and your material slots as you make them.
Opening it
The UV editor is a tab in the bottom dock, next to the node editor. Open it from the dock's + menu ▸ UV editor. Select a mesh in the viewport and its UV map appears; the dock's Undock button takes it out as a floating window, and the window's Dock puts it back.
The editor follows your selection. If you have an Edit Mesh session open it targets that object, and if you select a group it finds the textured mesh inside it.
Reading the map
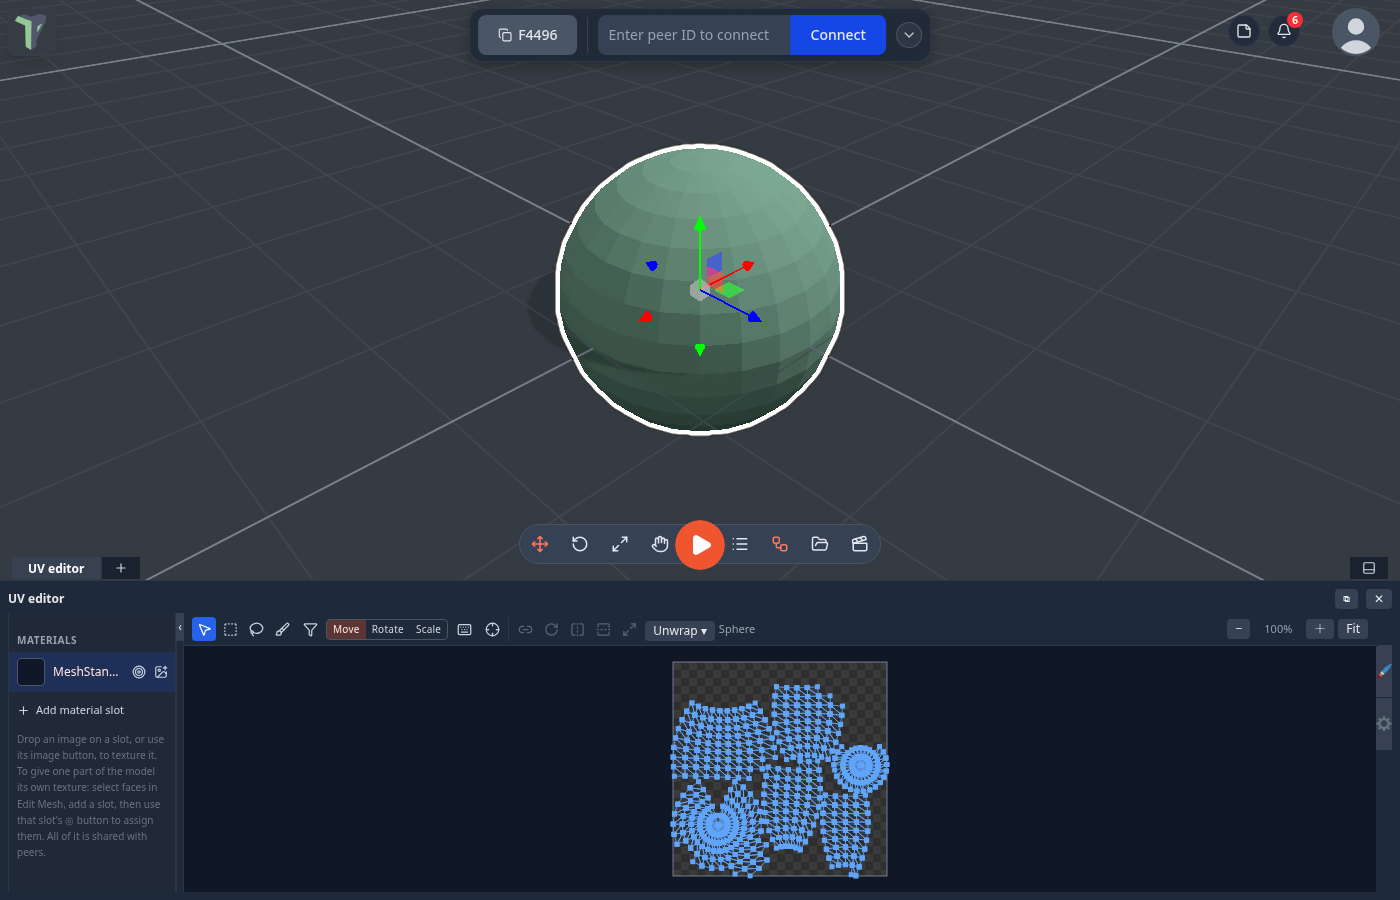
The square is UV space: the whole texture, from 0 to 1 on both axes. The mesh's triangles are drawn over it as a wireframe, so you can see which part of the image lands on which part of the model.
- Scroll to zoom, middle-drag to pan, Fit re-centres the square.
- Toggle wireframe, and the texture itself, from the view controls.
Big models show, but don't drag
Two limits, for two different reasons:
- Above about 20 000 triangles the wireframe and its handles are hidden — drawing 300 000 line segments per frame would grind. The texture still shows and painting still works.
- Moving UVs rewrites the geometry, which has to fit one sync message, so on very dense meshes dragging is disabled with a note saying so. Painting is unaffected — it writes to the image, never the geometry.
Moving UVs
Pick a selection tool from the toolbar:
| Tool | What it does |
|---|---|
| Select | Click a vertex; Shift (or Ctrl) adds. Dragging the background pans; clicking it deselects. |
| Box | Drag a rectangle; everything inside is selected. |
| Lasso | Draw a shape around the vertices you want. |
| Paint | See Painting below. |
Drag any selected point to move it. Each drag is one undo step and replicates when you let go.
Move, rotate and scale
The topbar arms one of three transform modes — press 1, 2 or 3 — and every gesture below applies whichever is armed:
| Gesture | Does |
|---|---|
| Left-drag a selected point | Transform with the pointer |
| Middle-click a selected point | A grab: the selection follows the cursor with no button held. Click or Enter commits, Esc puts it back |
| Arrow keys | Nudge by exactly one texture pixel, rotate by one degree, or scale by 1% — Ctrl ×10, Shift ×100 |
Scaling with the arrows is per axis — left/right scales in U, up/down in V, and Alt makes it uniform. Shrinking is the exact reciprocal of growing, so a press one way and a press back leaves the map where it started. Every press is its own undo step.
The transform origin
Rotation and scaling happen about a placeable origin. Press the ⌖ button (or use the right-click menu) and click where you want it; drag it around at any time. It snaps onto the nearest UV point unless you hold Alt.
The origin is a local editing aid — it is never replicated and never saved.
Selecting from the keyboard
| Keys | Does |
|---|---|
| Ctrl+Space | Enter cursor mode and drop a cursor; press again to take or drop the cursor's point |
| Arrows (in cursor mode) | Walk the cursor to the nearest point in that direction |
| Ctrl+Shift+arrow | Grow the selection in that direction |
| Esc | Leave cursor mode, keeping the picks; again clears them |
| Ctrl+A / Ctrl+I / L | Select all / invert / grow to the linked island |
Only the faces you picked
A primitive's sides usually share the same UV space — a default cube has 24 UV entries but only four distinct coordinates, so dragging one side drags all six. The Only selected faces toggle scopes the editor to the faces you have picked in Edit Mesh, which is how you separate them.
Island tools
An island is a connected patch of the map — a piece of the model that was cut out and laid flat on its own.
| Button | What it does |
|---|---|
| Linked | Grow the selection to the whole island it touches. |
| Rotate | Turn the selection 90°. |
| Flip U / Flip V | Mirror it horizontally / vertically. |
| Fit | Scale the selection to fill the 0–1 square, keeping its aspect. |
Unwrapping
Unwrap ▾ generates a fresh mapping for the mesh. Four projections ship with the app:
| Backend | Good for |
|---|---|
| Box projection | General shapes — projects from all six directions and packs the pieces. |
| Planar projection | Flat things: a wall, a sign, a ground plane. |
| Cylindrical | Tubes, columns, bottles, tree trunks. |
| Spherical | Balls, domes, planets. |
The result is packed into the square with a small margin, and never stretched unevenly — a non-uniform fit would shear the texture.
Unwrap just one part
If you have faces selected in Edit Mesh, unwrap rewrites only those faces and leaves the rest of the map alone. That is how you re-do one panel of a model without disturbing everything else.
Unwrap is a registry, not a fixed list: a module can add a heavier automatic unwrapper — or replace a built-in — and it appears in this menu like the rest. See Module SDK.
Smart unwrap (xatlas)
Since 1.28 the Smart unwrap (xatlas) module adds Smart (xatlas) to the Unwrap menu. Instead of projecting from a direction, it places the seams itself, flattens each piece and packs them all into the 0–1 square with no overlaps.
- Install it from Menu ▸ Modules ▸ Browse ▸ Smart unwrap (xatlas). The Unwrap menu picks it up the next time you open it — no need to reopen the editor.
- Select a mesh, open the UV editor and pick Unwrap ▸ Smart (xatlas).
Like the built-in projections, it unwraps only the faces you picked in Edit Mesh if you picked any. It is one undo step, and your peers get the new mapping.
Limits
- It takes about 0.1 s for a few hundred triangles and about 1–1.5 s for 10,000; the app waits while it works.
- Pieces are never rotated: xatlas turns a piece by mirroring it, and painted text would then read backwards.
Painting
Pick the Paint tool and draw — on the UV map or straight on the model in the viewport. Set the brush colour and size in the panel.
- Strokes appear live for your peers while you draw.
- Each stroke is one undo step.
- The finished image is stored with the material, so it saves and loads like any other texture.
If the slot has no texture yet, painting creates one.
Painting over a texture ends its link to the library image it was made from, so a later save in the Image editor will not paint over your strokes.
Pen pressure
Paint with a pen and pressure shapes the stroke. The Pen pressure switch in the Brush panel picks what it changes:
- Size (the default) — a light touch paints thin, a firm one paints the full brush size.
- Opacity — the width stays put and a light touch paints faint.
- Off — every dab is the same.
A mouse or finger stroke is unchanged whichever you pick, and peers watching a live pen stroke see the same widths you do. Fast strokes are sampled between frames, so a quick curve comes out smooth rather than as a string of dots.
Material slots
One mesh can carry several materials. The Materials list in the sidebar shows the slots; the canvas shows the slot you have selected.
| Action | How |
|---|---|
| Add a slot | Add material slot — copies the last one, so you start from something sane. |
| Give it an image | Drop an image on the slot, or use its image button. |
| Assign faces to it | Select faces in Edit Mesh, then press that slot's ◎ button. |
| Remove an image | The slot's ✕ button. |
Slots replicate, save and undo like everything else, and a mesh you made with Convert to mesh arrives with one slot per original material already set up.
Note
Switching a multi-slot mesh to a different material type is refused rather than silently collapsing it to one material — split it first if that's what you want.
The texture panel
Under Texture the sidebar reports the selected slot's real size and roughly what it costs on the GPU, with one-click resizes:
- Half — halve the longest side.
- 512 / 1024 / 2048 — resize the longest side to that.
Resizing keeps the aspect ratio, is shared with peers, and is one undo step. It is the quickest fix for a scene that has become heavy because a few 4K textures came in with imported models.
UV test grid
UV test grid replaces every material in the scene with a checkerboard so you can see stretching and seams at a glance: even squares mean an even mapping.
Local only, on purpose
The grid is yours alone — it is never sent to peers and never saved. (It replaces materials scene-wide while it is on, which is why it can't be: baking it into an autosave would overwrite someone's real textures.)
Imported models
Textures that arrive with a .glb/.gltf keep their sampler settings — tiling, orientation, filtering — when you paint over them, so a repeating texture goes on repeating and nothing flips. Imported models usually arrive already unwrapped; you'd unwrap one only to redo its mapping deliberately.
See also
- Mesh Editing — selecting the faces the UV tools scope to.
- Explorer — where your image assets live.
- Saving & Sessions — how textures travel inside a
.tpscene.