Publish & Export
Menu ▸ Publish / Export puts a scene somewhere other people can play it. The window has four tabs:
| Tab | What it does |
|---|---|
| Publish | puts the scene on theprototype.app's community, with its own page and a play link that opens straight into the game. Needs you signed in on theprototype.app (a self-hosted build says where publishing lives) |
| Export | builds the game as a zip of plain HTML you can host anywhere — itch.io, your own site, any static host — or an <iframe> snippet |
| Community gallery | builds a submission for the open community gallery on GitHub — no sign-in needed |
| Settings | how an exported or embedded game starts: fullscreen, FPS counter, quality, VR button (also in Settings ▸ Export) |
Publish: the play link
Publishing works as before — sign in, title, tags, license, visibility, contest (see Community). When it is done you get two links:
- Play link —
https://theprototype.app/p/‹id›: opens straight into the game, with no editor around it. Copy it, or scan its QR code with a phone or a headset. Unlisted scenes have a play link too; only people with the link can open it. - Scene page —
https://theprototype.app/s/‹id›: likes, comments, remix, download. Its Play button now uses the play link.
In a self-hosted copy of the app the Publish tab only says where publishing lives. Export works everywhere.
What a player sees
A play link, an embed and an exported game all open the same player:
- Before play starts (and after Esc) a start card offers ▶ Play — and, in a headset's browser, Enter VR — with the hint Click to look around · Esc to pause. The click is needed: a browser only locks the pointer, goes fullscreen or enters VR after a real click.
- A fullscreen button sits in the bottom-left corner where the page may go fullscreen.
- A play link or embed also has Open in theprototype.app ↗, which opens the same scene in the full editor.
- The Made with ThePrototype badge — a small, semi-transparent TP logo with solid dark-grey accents, so a game's colours never tint it — sits in the bottom-right corner; hovering shows Made with ThePrototype, clicking opens theprototype.app in a new tab. It moves up out of the way of a game's touch buttons and is not drawn inside a VR headset.
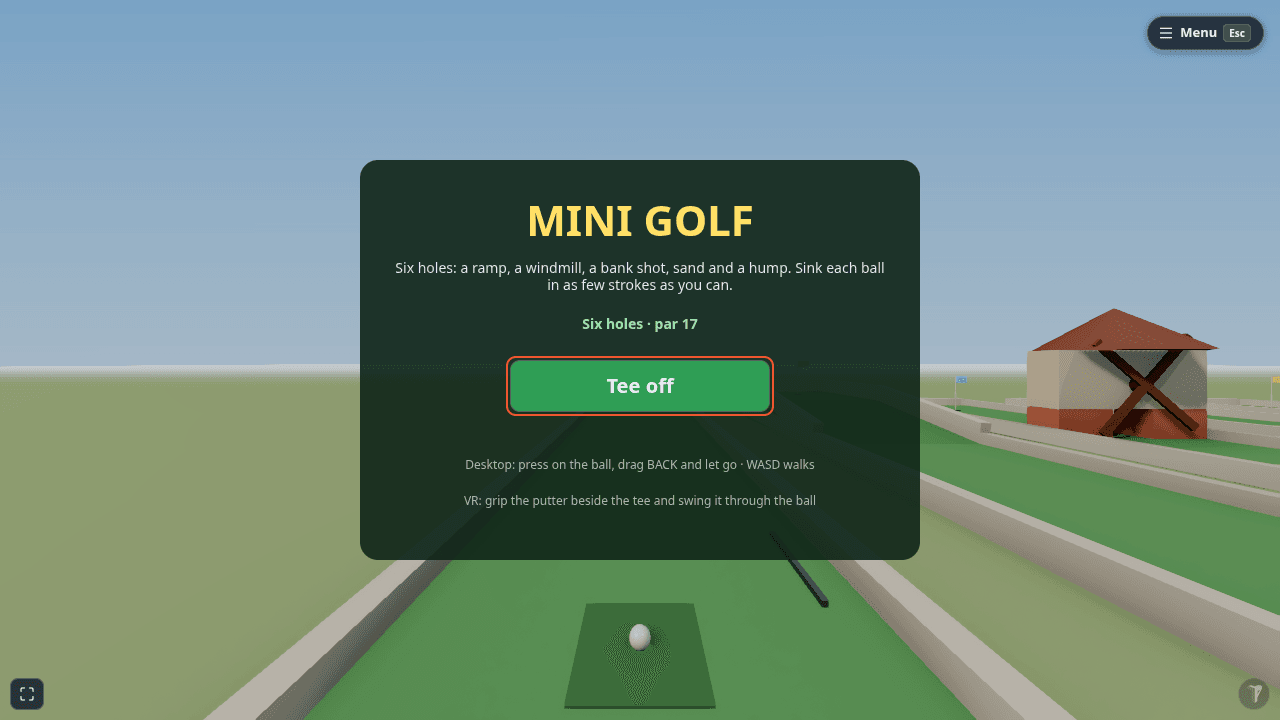
The badge is always on in play links, embeds and exports. An exported file is yours to edit, so this is a request, not a lock — please keep it: it is how other people find the tool you made your game with. Clicks on the badge are counted per game, with no personal data, so we can see how many people arrive from games made here — and you can see yours in Your games & stats.
Export: a game in a zip
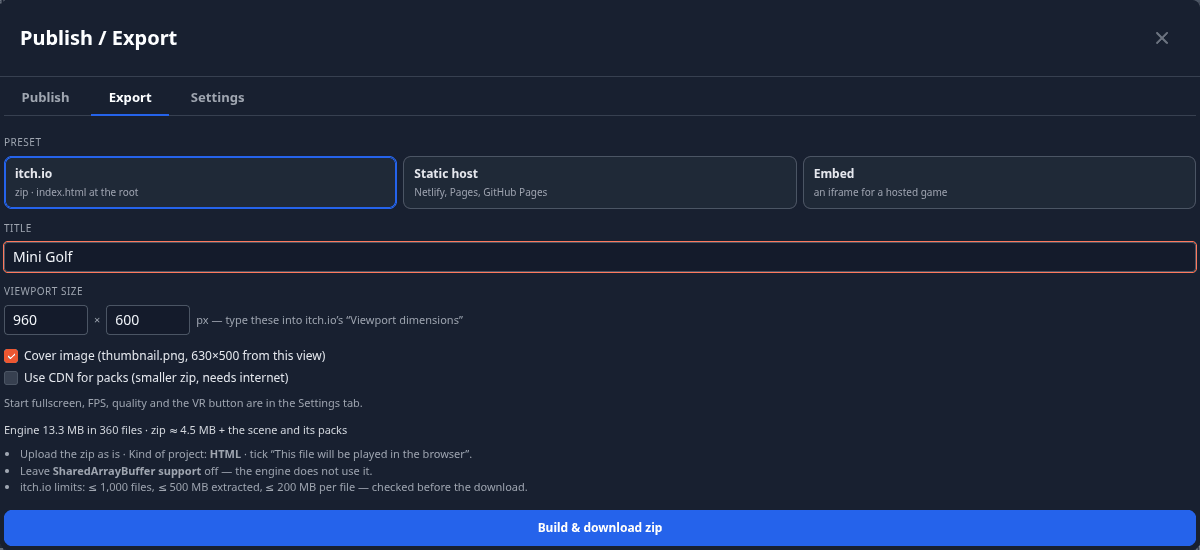
- Open the scene, then Menu ▸ Publish / Export ▸ Export.
-
Pick a preset:
Preset Use it for itch.io an HTML5 game page on itch.io: a zip with index.htmlat the root (guide below)Static host the same zip plus a .nojekyllfile — Netlify, Cloudflare Pages, GitHub Pages, any web serverEmbed an <iframe>snippet for a game that is already online (below) -
Set the Title (the page title and the zip's name) and the Viewport size (the size of the game's frame — for itch.io, the numbers you type into its Viewport dimensions).
- Options: Cover image (a
thumbnail.png, 630 × 500, taken from your current view) and Use CDN for packs (a smaller zip: kit pieces load from the packs CDN when the game starts, so it needs internet; off, every pack file the scene uses is copied into the zip). - The panel shows how big the engine is and estimates the zip. Press Build & download zip.
The build is checked before it downloads (relative paths only, the file limits of the preset); the result line names
the file, its size and its file count, and says checked OK. The zip holds index.html, the engine (the same build the
app runs), your scene, the installed modules it uses, the pack files it uses and a README. All paths are relative, there
is no service worker, and nothing loads from another site unless you chose the packs CDN. The game starts in Play on its
own. A typical game export is about 5 MB in about 365 files.
Some web hosts add their own scripts to the pages they serve. The exporter copies the app from the site you are on, so it removes any script or link that points at another site before the check — an exported game loads nothing from the internet:
- the host's own analytics script (Cloudflare Pages Web Analytics) is removed quietly, and listed under Details (collapsed) in the export result;
- any other script from the internet is removed too, with a visible warning, because you may want to know about that one.
Hosting it elsewhere
Unzip it into any folder of any static host — a subfolder works too. It does not run from file:// (browsers refuse
module scripts there); for a quick local look, run npx serve . in the folder.
Limits
- Exporting needs a built copy of the app (theprototype.app, a preview, or
npm run build); a development server cannot export. - An exported game is single player — multiplayer is off.
- Models the scene loads from absolute web addresses (the Khronos sample models, for example) still load from there.
- Texture compression is not available yet: textures go into the zip exactly as authored.
Publishing on itch.io
- Export with the itch.io preset and download the zip.
- On itch.io, open Upload new project (the menu under your name, or Dashboard).
- Give it a title, and set Kind of project to HTML.
- Under Uploads, upload the zip as it is, and tick This file will be played in the browser.
- Under Embed options, type the export's Viewport size into Viewport dimensions, tick Fullscreen button — and Mobile friendly if your game has touch controls. Leave SharedArrayBuffer support off; the engine does not use it.
- Save as a Draft, open the page and play it once; then set Visibility to Public.
itch.io's limits — at most 1,000 files, 500 MB unzipped, 200 MB per file and 240 characters per file path — are checked
by the export before it downloads. From the command line, butler push mygame-itch.zip ‹user›/‹game›:html5 uploads it.
Updating the game
Upload the new zip and delete the old one (or use itch.io's butler push, which uploads only what changed). Keep the
same project page, so the link people have keeps working.
Embedding on your own site
Choose the Embed preset and paste the game's address into Game URL — a play link from the Publish tab (it is
filled in for you once you have published), or the address where you host a static export. The panel shows the
<iframe> snippet, sized from the Viewport size; Copy snippet and paste it into your page.
A public community scene also has an Embed button on its page — see Embedding a scene.
The Community gallery tab
The community gallery (shown in Templates ▸ Community) is a public GitHub repository, and a submission is a pull request a maintainer reviews before anyone sees it. Publish / Export ▸ Community gallery builds the submission for you, and works without signing in:
- Fill in the Title, your GitHub handle, the License (CC0, CC BY or MIT), a short description and up to six tags. The thumbnail is taken from your current view (Retake from this view to change it).
- Tick Everything in this scene is mine to license this way.
- Build submission zip downloads
‹slug›-gallery-submission.zip: the‹slug›/folder (scene.tpscene, the thumbnail,entry.json),gallery-row.jsonandHOW-TO-SUBMIT.txt. - Upload the folder on GitHub opens GitHub's upload page for that folder: drop the three files in. GitHub forks the repository for you and offers Propose changes.
- Copy the gallery.json row copies the row and opens
gallery.jsonfor editing: add it to theentrieslist on the same pull request.
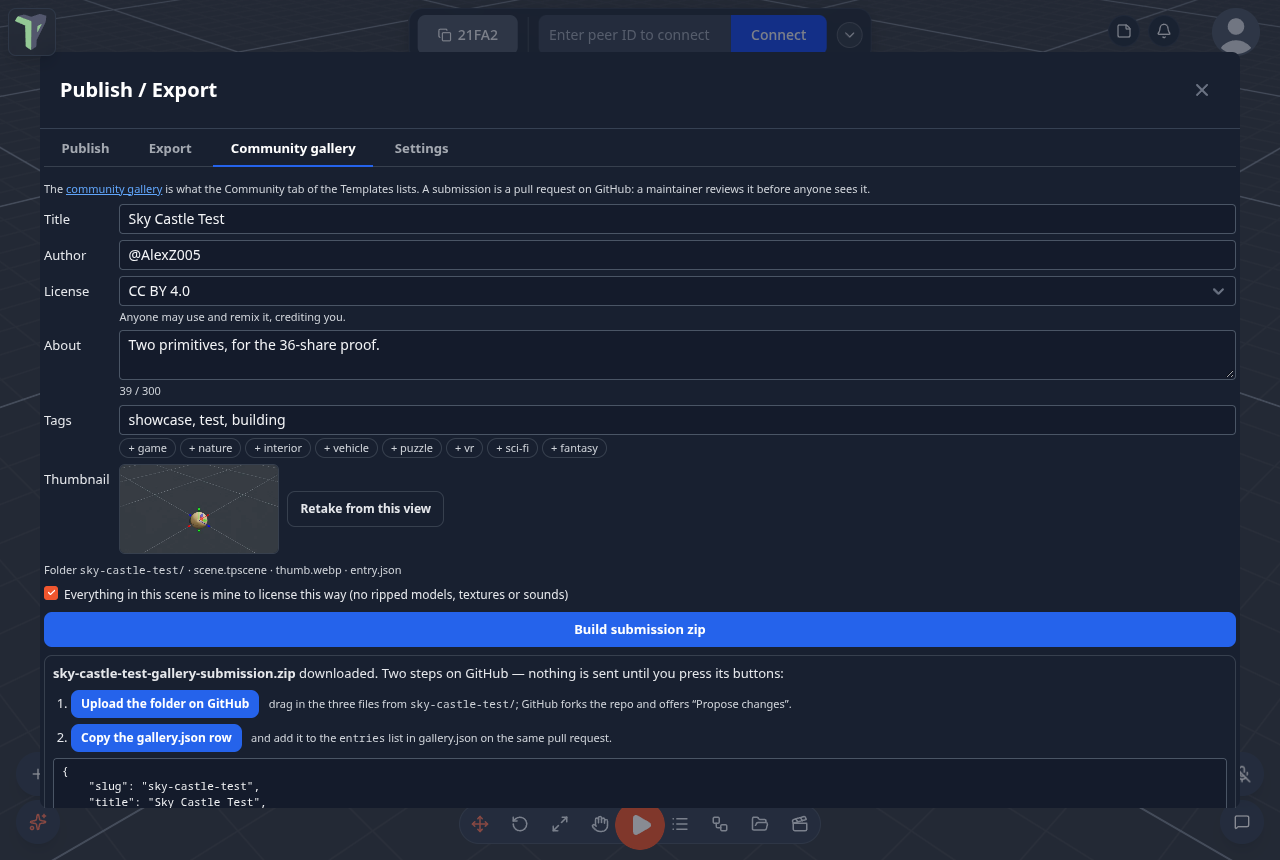
The app never sends anything itself; every step on GitHub is your click. Before you start, the tab checks the same rules as the gallery's own checks: the scene at most 25 MB, the thumbnail at most 512 KB, a license, a title of at most 80 characters and a description of at most 300.
Export settings
Publish / Export ▸ Settings, also in Settings ▸ Export (all per device, used by the next export):
| Setting | Default | What it does |
|---|---|---|
| Show Made with ThePrototype badge | on (always) | cannot be switched off — see above |
| Start fullscreen | off | the first Play press also asks the browser for fullscreen |
| Show FPS | off | the game starts with its frame counter on; players can still switch it in the game's menu |
| Quality | Auto | the quality a player starts at — Auto, High, Medium, Low. Auto steps down by itself when frames run slow |
| Include VR button | on | on a headset browser the start card offers Enter VR; off, the game always plays on the screen |
| Use CDN for packs | off | as in the Export tab |
| Compress textures | — | not in this release |