Terrain & Sculpting
Add ground and shape it two ways: procedurally, by dialling in hills from a handful of numbers, and by hand, with a brush that raises, lowers, smooths and flattens. Every edit replicates to your peers.
Adding terrain
Right-click the viewport ▸ Add ▸ Ground ▸ Terrain (or the Add menu, Shift+A). This drops a flat 24 m × 24 m plane at the point you click, subdivided into a 48×48 grid and tinted a soft sage green.
The 48-segment resolution is deliberate: it's the densest grid that still fits the limit for streaming edited geometry, so a fully sculpted terrain always replicates cleanly. For bigger worlds, tile several terrains rather than asking for one huge one — see Bigger worlds below.
Terrain is a normal scene object: it selects, transforms and replicates like anything else.
Procedural hills
A fresh terrain starts flat, and its shape is parametric — select it and open Properties ▸ Geometry:
| Row | What it does |
|---|---|
| Size | The tile's extent in metres (1–200) |
| Segments | Grid resolution per side (2–48) |
| Seed | Which landscape you get. Same seed, same hills, on every peer and in every session |
| Height | How tall the hills are. 0 is flat — the starting state |
| Detail | Feature size: low is broad rolling ground, high is tight and noisy |
| Octaves | Layers of detail (1–6). More octaves add finer texture without changing the height |
| Ridged | Turns smooth hills into creased ridges — mountainous rather than rolling |
| Warp | Bends the pattern so features stop looking regular |
| Edges | flat (uniform), island (high in the middle, falling to the rim) or bowl (low in the middle, rising at the rim) |
| Tile X / Tile Z | Which part of the landscape this tile shows — see below |
Set Height above zero and hills appear. Every row is live: scrub Seed to shop for a landscape, then raise Octaves for detail.
Why the numbers, not the mesh
Only these ~11 numbers travel to your peers, and only they are stored in a saved scene — everyone rebuilds the same hills from the same values. It also means a terrain stays fully re-shapeable: change the seed a month later and the landscape re-rolls.
Bigger worlds
Use several tiles with the same Seed and different Tile X / Tile Z, offset by exactly one Size each. All tiles then sample one continuous landscape, so their edges meet seamlessly.
Use those two rows — never a move — to choose which part of the landscape a tile shows. Dragging a tile with the gizmo slides its mesh but not the landscape it was cut from, so the join stops matching.
Four tiles of a 24 m world:
| Tile | Tile X | Tile Z |
|---|---|---|
| north-west | 0 | 0 |
| north-east | 24 | 0 |
| south-west | 0 | 24 |
| south-east | 24 | 24 |
(Place each tile in the scene as usual — the offsets only decide which slice of the landscape it draws.)
Edges: making a ring of mountains
Edges ▸ bowl raises each tile toward its rim, so a grid of bowl tiles gives a basin ringed by high ground — the classic arena. island does the opposite for a single tile meant to sit in water or void.
Sculpting by hand
Right-click the terrain ▸ Sculpt terrain. This selects the object (which locks it so peers can't edit it at the same time) and opens the Sculpt toolbar — a floating tool palette you can drag anywhere.
Drag on the terrain surface to sculpt. A ring cursor follows your pointer, hugging the surface, to show the brush footprint.
The Sculpt toolbar
| Control | What it does |
|---|---|
| ⛰ Raise | Pushes the surface up under the brush. |
| ⛏ Lower | Pushes it down. |
| 〰 Smooth | Relaxes bumps toward the local average — softens what you've made. |
| ▭ Flatten | Pulls the surface toward the height where you first touched down. |
| Radius | Brush size, 0.5 – 8 m (default 3). |
| Strength | How fast the brush moves the surface, 0.05 – 1 (default 0.5). |
| Done ✕ | Leaves sculpt mode (Esc also exits). |
Each brush stroke — from pressing down to lifting the pointer — is one undo step (Ctrl+Z). While you drag, peers see a live preview several times a second; when you release, the final shape is committed and synced.
Since 1.28 you can sculpt terrain from a VR headset too: radial menu ▸ Add ▸ Terrain, or select a terrain and pick Selected ▸ Sculpt terrain — see Sculpting terrain in VR.
Sculpting any mesh
The same brush works on any mesh, not just terrain: right-click an object ▸ Sculpt mesh. The difference is which way the brush pushes — on terrain it moves the surface straight up and down, on a mesh it moves along the surface's own normals, so you can bulge and dent a shape from any angle. Flatten pulls toward the plane you first touched and Smooth relaxes the surface toward its local average, exactly as on terrain.
Under the hood
Sculpting only moves the surface up and down, never sideways, so the grid stays watertight and normals are re-smoothed after every edit — no faceted seams. The result travels to peers as a geometry snapshot on the same channel used by mesh editing.
Painting layers
Since 1.38 a Terrain can be painted with four texture layers. Select it ▸ right-click ▸ Sculpt terrain (or Inspector ▸ Terrain paint ▸ Paint…) and pick the Paint brush after Raise / Lower / Smooth / Flatten.
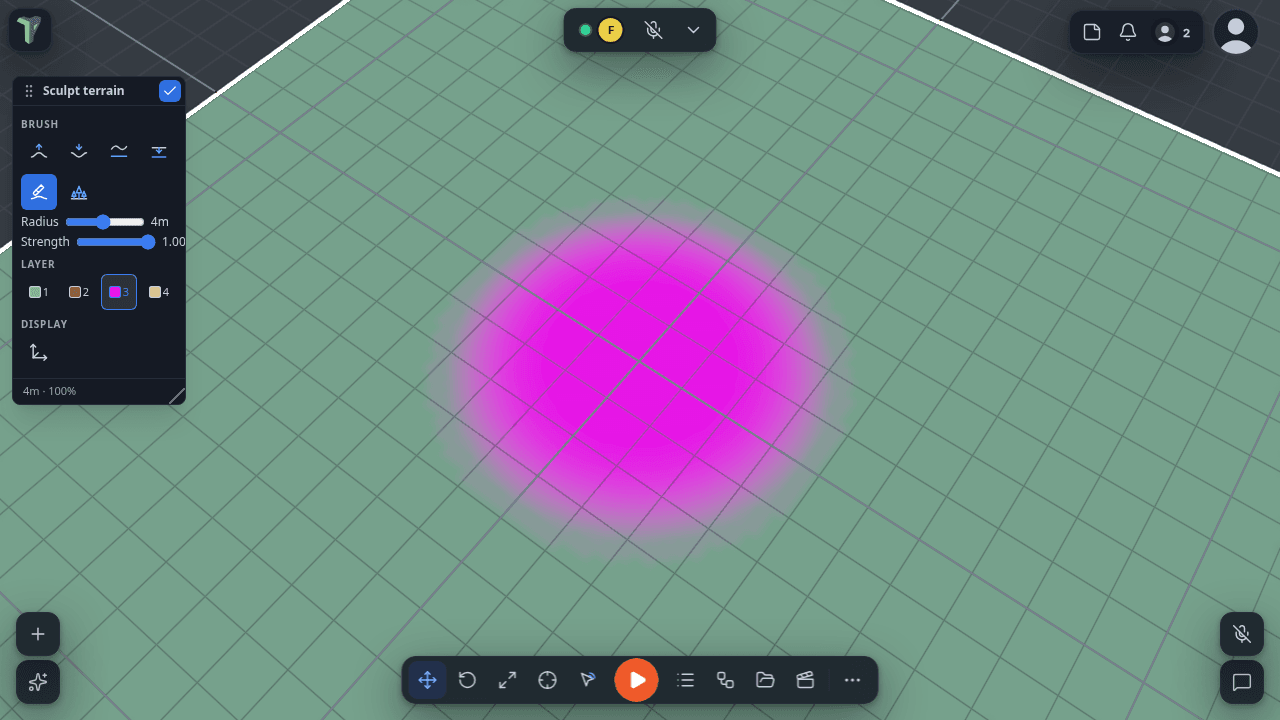
- Pick a layer (1–4) in the toolbox, then drag on the terrain. Radius and Strength are the sculpt brush's.
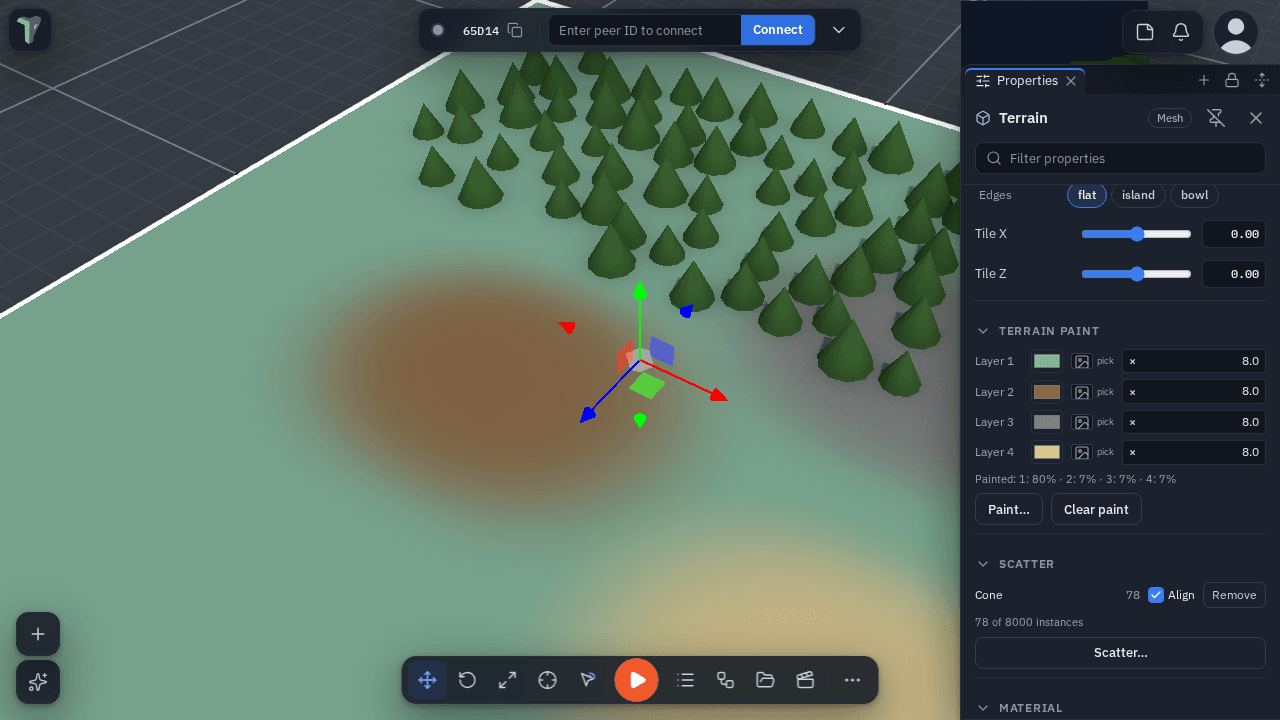
- Inspector ▸ Terrain paint sets, per layer, a colour, a texture (import a file or drop an Explorer image) and tiling (how often the texture repeats across the terrain). Layer 1 is the terrain's own material until you give it a colour or texture (Use the material for layer 1 goes back), so the first stroke on a fresh terrain only changes where you paint.
- The coverage line shows how much of the terrain each layer covers; Clear paint removes all of it.
- One drag = one undo step. Peers see the stroke while you paint and exactly your result when you let go; the paint is saved with the scene.
Scatter
The Scatter brush paints instances of a primitive or any 3D model in your Library — trees, rocks, grass tufts — onto the terrain.
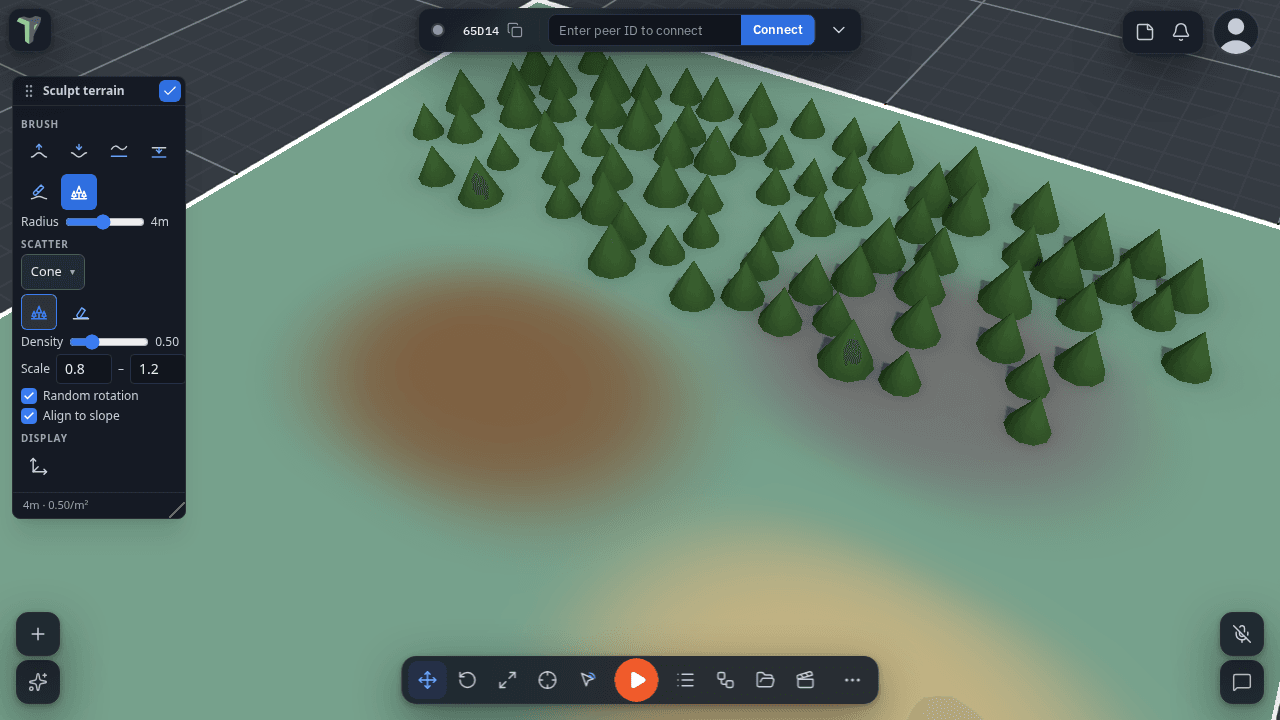
| Control | What it does |
|---|---|
| Source | A primitive, or any model in your Library. |
| Paint / erase | Paint adds instances; the eraser removes that model's instances under the brush. |
| Density | Instances per m² — painting over a patch fills it up to that density and never past it. |
| Scale min – max | A random size per instance. |
| Random rotation | Turns each instance around its vertical axis. |
| Align to slope | Tilts instances to the ground. |
Instances follow the ground — sculpting the terrain later moves them with it. Inspector ▸ Scatter lists each scattered model with its count, an Align toggle and Remove. Scatter is counted by the budget chip on the terrain's row, and a dense model (300 triangles or more) switches to lighter levels of detail with distance — instances far away draw fewer triangles.
Limits
Up to 8,000 instances and 8 scattered models per terrain. For a Quest, keep it near 2,000 instances of a low-poly model (≤ 150 triangles each): each scattered model is one draw call (a dense one, a few — it is drawn in patches so its levels of detail can switch), plus one per shadow-casting light. Instances cannot be selected one by one, and are solid only when their model has a Collider. Older versions open a painted or scattered terrain as the plain terrain.
Scatter ▸ Collider
New in 1.39. A scattered model — a rock, a tree trunk, a primitive — can be solid in a simulation. Each scattered model has a Collider:
| Collider | Shape |
|---|---|
| None (the default) | No collider — the instances are scenery you pass through. |
| Box | The model's bounding box. |
| Sphere | A ball reaching the model's farthest point. |
| Mesh hull | The model's convex hull — the closest fit for a rock (a flat model falls back to its box). |
Where: select the terrain ▸ Properties ▸ Scatter ▸ the model's row ▸ Collider. The Sculpt toolbox's Scatter brush has a Collider pick too: it is what a newly scattered model starts with — painting more rocks into an existing set never changes that set's collider.
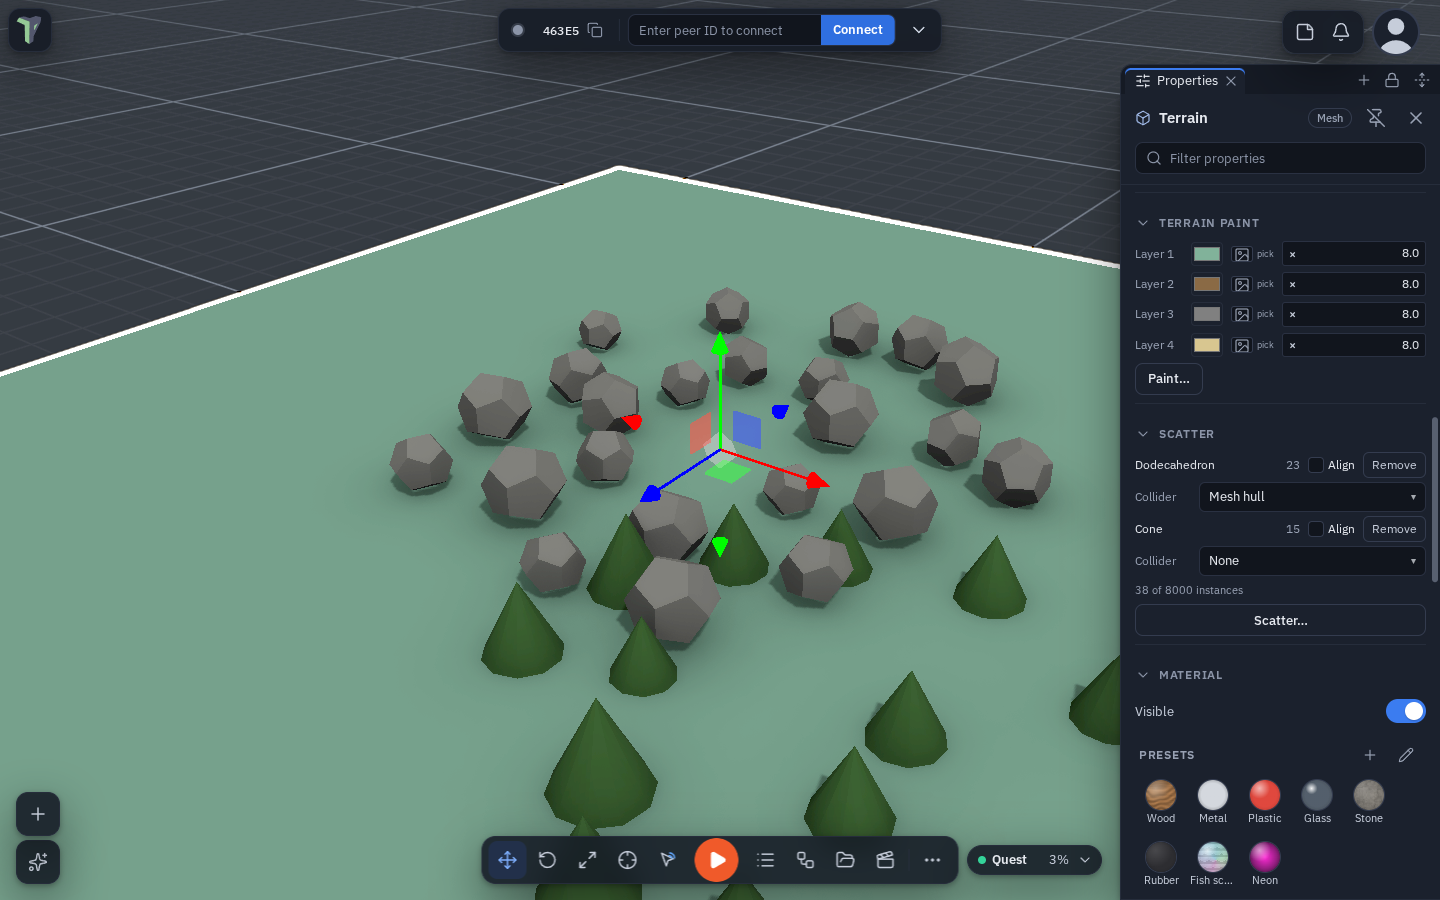
- While a simulation runs, every instance of that model is a static collider — a thrown ball bounces off the rocks and stops on top of one. The colliders follow each instance's position, rotation, scale and Align to slope tilt, and the terrain's own transform; a terrain moving mid-run does not drag them along.
- The choice is part of the scene: saved, one undo step per change, and every player gets the same colliders, whoever runs the simulation.
- A hit on a scattered rock counts as a hit on the terrain — On Impact and friends name the terrain.
Only what a player can reach
2,000 instances build their colliders in 10–40 ms when the simulation starts and add about 0.1 ms per physics step. Give colliders to the rocks and trunks a player can actually touch, not to grass.
Hand edits lock the parametric rows
The moment you sculpt a terrain — or carve a road into it, or edit it in mesh mode — the Geometry rows lock, and the panel says so.
That's deliberate. Those rows rebuild the terrain from its numbers, which would throw the hand work away, and nudging a seed by accident should not cost you an afternoon of sculpting.
When you do want the parametric shape back, press Regenerate (discards the sculpt) and confirm. The rows return and the ground goes back to what the numbers say.
Regenerate really does discard it
The sculpted shape is still in your undo history, but it takes more than one Ctrl+Z to walk back to it. Treat Regenerate as deliberate.
Roads, paths and rivers
To fit a spline and a terrain together, use Flatten on the spline's right-click menu: Terrain to this spline cuts a level bed for it, and This spline onto a surface drops the spline onto the ground instead. Both are one undo step, and both ask you to click the other object.
Sculpting vs. mesh editing
Sculpting is its own mode, separate from the vertex/edge/face mesh edit mode (Tab):
- Sculpt is brush-based and reached from the Sculpt terrain / Sculpt mesh menu entry — for organic shaping, where you don't care which vertex is which.
- Mesh edit is precise: it selects and moves individual vertices, edges and faces, and it's where extrude, bevel, knife and the loop tools live.
They never overlap — entering one doesn't affect the other. Sculpting never changes the number of vertices, so shape a mesh first and sculpt it after.
Desktop only
Terrain sculpting is a desktop feature. It isn't available in VR yet.